Records: overview, creating, copying and deleting
In brief: Records are the heart of construction site documentation in BauMaster. Every record belongs to exactly one project and one record style; you capture the individual record entries in it. This overview shows how to create, edit, close, copy and delete a record.
Prerequisites: you have created a project and selected the record styles you want in the project settings. Optionally you prepare drawings for drawing markers and contacts. Records are created and edited by users with a Smart or Expert licence. Viewers and Teamworkers only see entries assigned to them, or where the project team is selected as the company.
How records work in BauMaster
A record typically goes through four steps:
- Define record styles — once, in the project settings, define which styles are available (site meeting, site walk, defect record).
- Create the record — set the basic details (see below).
- Capture entries — document the individual record entries, see Create, copy and move record entries.
- Send as PDF — send the record and set the layout, see Send a PDF record and PDF layout settings and PDF presets.
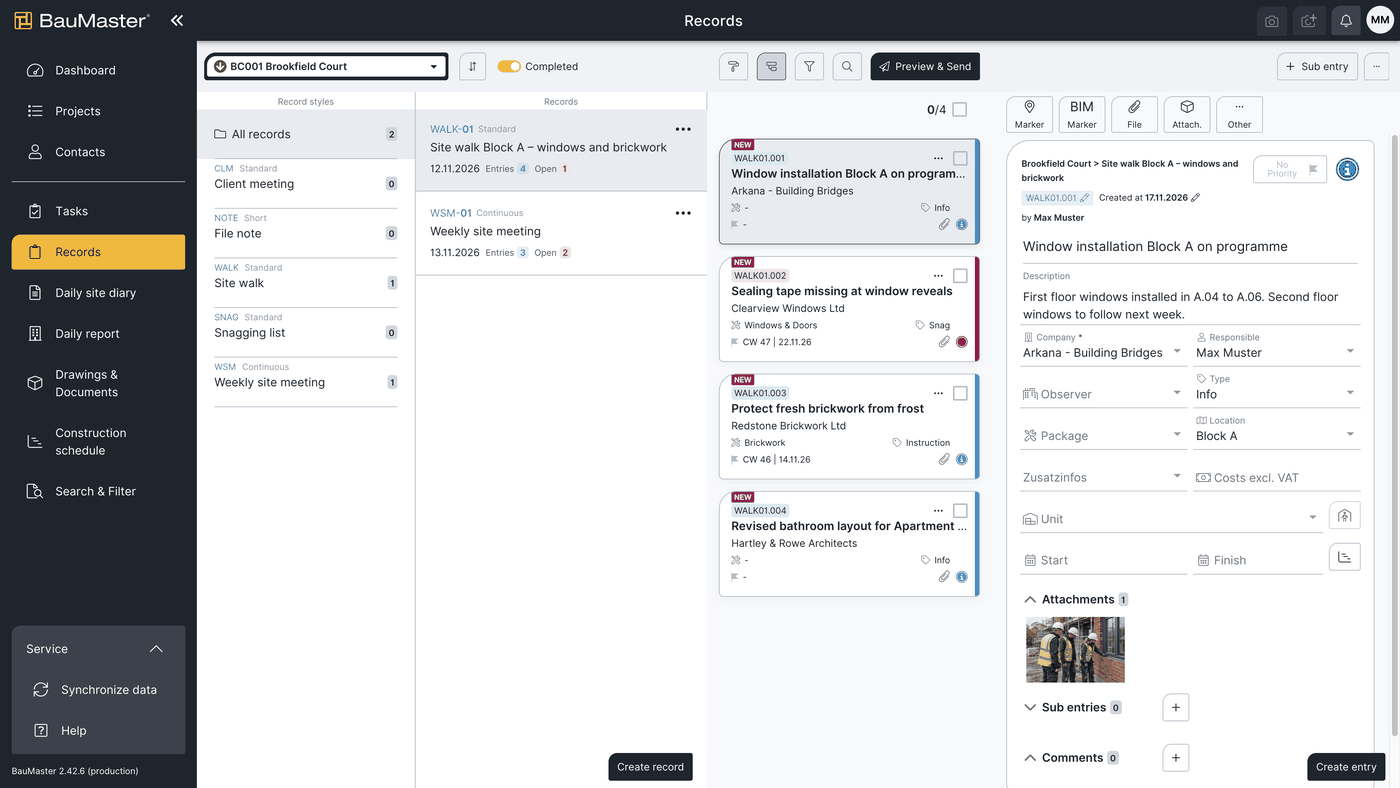
You reach records via the burger menu at the top left, and on mobile devices and tablets also via the bar at the bottom. The record overview is split into columns: record styles, the records belonging to them, their entries, and a detail preview of the selected entry.
Create a record
All records are assigned to a project. Click the plus at the bottom right (on a PC, create record in the second column) and create your record. You can store the following information:
- Record title (required): appears on the PDF record.
- Record style (required): the styles enabled in the project settings are available.
- Record number: 0 to 999. For continuous records the number cannot be changed — the next record is given the next number automatically.
- Location details (optional): project address (from the project settings), office address (the address of your own company in contact management) or other (free text).
- Date: the record date, for example the meeting date. It is prefilled with the creation date and can be changed — so you can create the record for Monday’s meeting on Sunday.
- From – to: meeting period (optional).
- Sort entries by: chronological (by creation date) or by details (trade, company, custom field). For a detail value the entries are additionally grouped: in the PDF record the values appear as headings, for example company A, company B.
- Costs: records have a cost field. Via the three-dot menu on the record → Edit details, a checkbox defines whether the costs given in a record entry are calculated with or without VAT. You store the VAT rate in the project settings.
- Weather: enter the weather manually or have it filled in automatically — with the weather on the record date at the project address.
- Default values for entries: fixed entry details can be defined for a specific record, for example always the same company in all entries, or the same type. This is possible for all entry details.
- Unit (owner) for standard records: units defined for this project can be linked to each entry. If owners or tenants are linked to the units, they are also shown on the entry in the record.
You then capture the record entries — each with short text, description and fields, and with photos, files and drawing markers where needed. Tasks are independent of records.
Edit and close a record
Edit a record
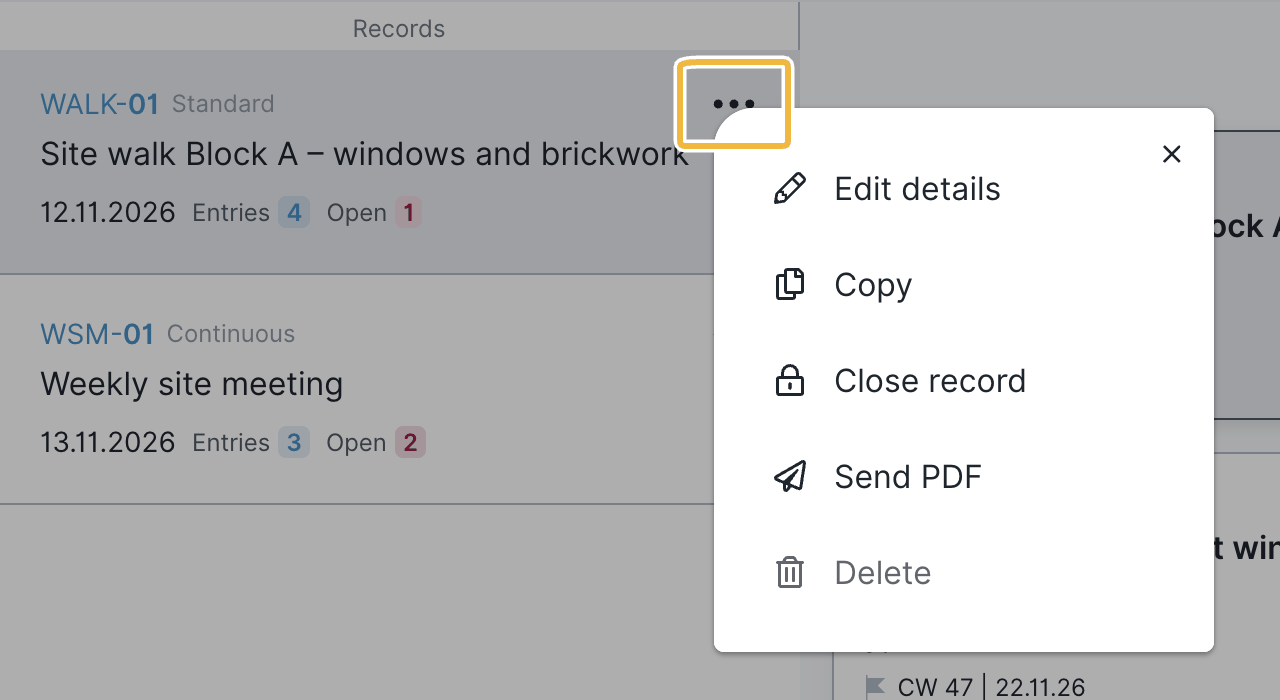
While a record is open you can change its entries at any time. You change the basic details such as record title, date, location details or sorting in the record overview via the three-dot menu on the record → Edit details.
Close a record
When a record is finished, close it — when sending, or via the three-dot menu on the record → Close record. Closing documents it in a way that is evidentially secure: the entries are then “frozen” and can no longer be changed in content. When sending, the last page of the workflow has a close record checkbox next to the send button.
- Still possible: adjust the status (to “done”, for example), change the “to be done by” date and the responsible person, add new sub-entries and copy entries.
- No longer possible: edit, move, convert, delete or re-sort entries.
- Continuous records: the current record must be closed before you create the next one. Entries on “open” and “to review” carry over automatically.
- Recognising closed records: in Drawings & documents → PDF records, the padlock symbol shows whether a record is closed.
Reopening a closed record: only admins can do this (admin rights require a Smart or Expert licence); for continuous records only the most recent one. Details: Reopen a closed record.
Copy a record
You copy an existing record into the same or another project. Copying requires an internet connection. Select the record, click the three-dot menu at the top right and then Copy. You define what is copied along:
- Copy attachments
- Add contacts to project: if you do not choose this, companies and responsible people not assigned in the target project are not copied.
- Copy markers: not possible when copying to another project, because the PDF drawing does not exist there.
- Copy details: fields such as status, trade, title and type.
- Copy creation date
- Copy comments
- Number of copies: define how many copies are created — one handover record each for five apartments, for example.
Tip: create a template record. BauMaster has no separate “template record” function. Instead, prepare a record with standard texts and references to legal texts, standards or contracts, and copy it into any project when needed. Settings, structure and layout for all records of a style are defined through the record style, which can also be understood as a “record template”.
Delete a record
Before you delete a record, all entries in it must be deleted. If the record is empty, click the three dots in the record overview and then Delete. If the record still contains entries, the delete function is disabled.
FAQ
Do I need a project for every record?
Yes, all records are assigned to a project. For a first test you can use the demo project.
What is a template record and how do I create one?
There is no separate template record function. A template record is a record you prepare with standard texts and a fixed structure and then copy into any project. You create it via the three-dot menu → Copy on the record you want.
How do I create several identical records at once?
When copying, enter the number of copies — one handover record for each of five apartments, for example.
Why can't I delete my record?
Because it still contains entries. Delete all entries of the record first; the delete function (three dots → Delete) then becomes active.
Which record styles are available to me?
Only the styles enabled in the project settings. You create new ones under record styles, see Create, edit and delete record styles.
How do I close a record?
When sending (close record checkbox next to the send button on the last page), or via the three-dot menu on the record → Close record. The entries are then frozen; status, “to be done by”, responsible person and new sub-entries remain possible.
Can I still change a closed record?
Not the entries in content — that preserves evidential value. Admins (Smart or Expert licence only) can reopen a closed record, for continuous records only the most recent one.
Who can create and edit records?
Users with a Smart or Expert licence create and edit records. Viewers and Teamworkers only see entries assigned to them, or where the project team is selected as the company.
Related topics
Setup and basics
Capture
PDF and sending
Manage
Keywords: create record