Send a PDF record
In brief: You send a record as a PDF in four steps: choose the distribution list, set the layout, activate additional functions and set up the email. Recipients receive the record as a link they can view and download. Optionally you send individual records per recipient, set a follow-up meeting, or have the record signed.
Start the send
You can send a record in two ways:
- Directly from the view of the record entries via Preview & send.
- In the record overview via the three dots on the right of the record → Send PDF.
You can also send filtered or individually selected entries separately: with entries selected, the Preview & send button turns into a button with the paper plane symbol; the sending workflow is the same. The slider in the record overview next to the project selection also shows closed records.
Four steps to the PDF
1. Choose the distribution list
Each contact has two checkboxes: distribution list decides whether the person receives the record by email. Attending records whether the person was present at the meeting or site walk. If a contact has no email address, the warning “Email address missing” appears — no PDF can be sent to that person.
- The preselection and project team checkboxes mark all assigned people, or all people assigned to the project, with one click — either for the distribution list or as attending.
- If you want to add digital signatures later, mark the relevant contacts here as attending.
- The search function helps you find contacts faster.
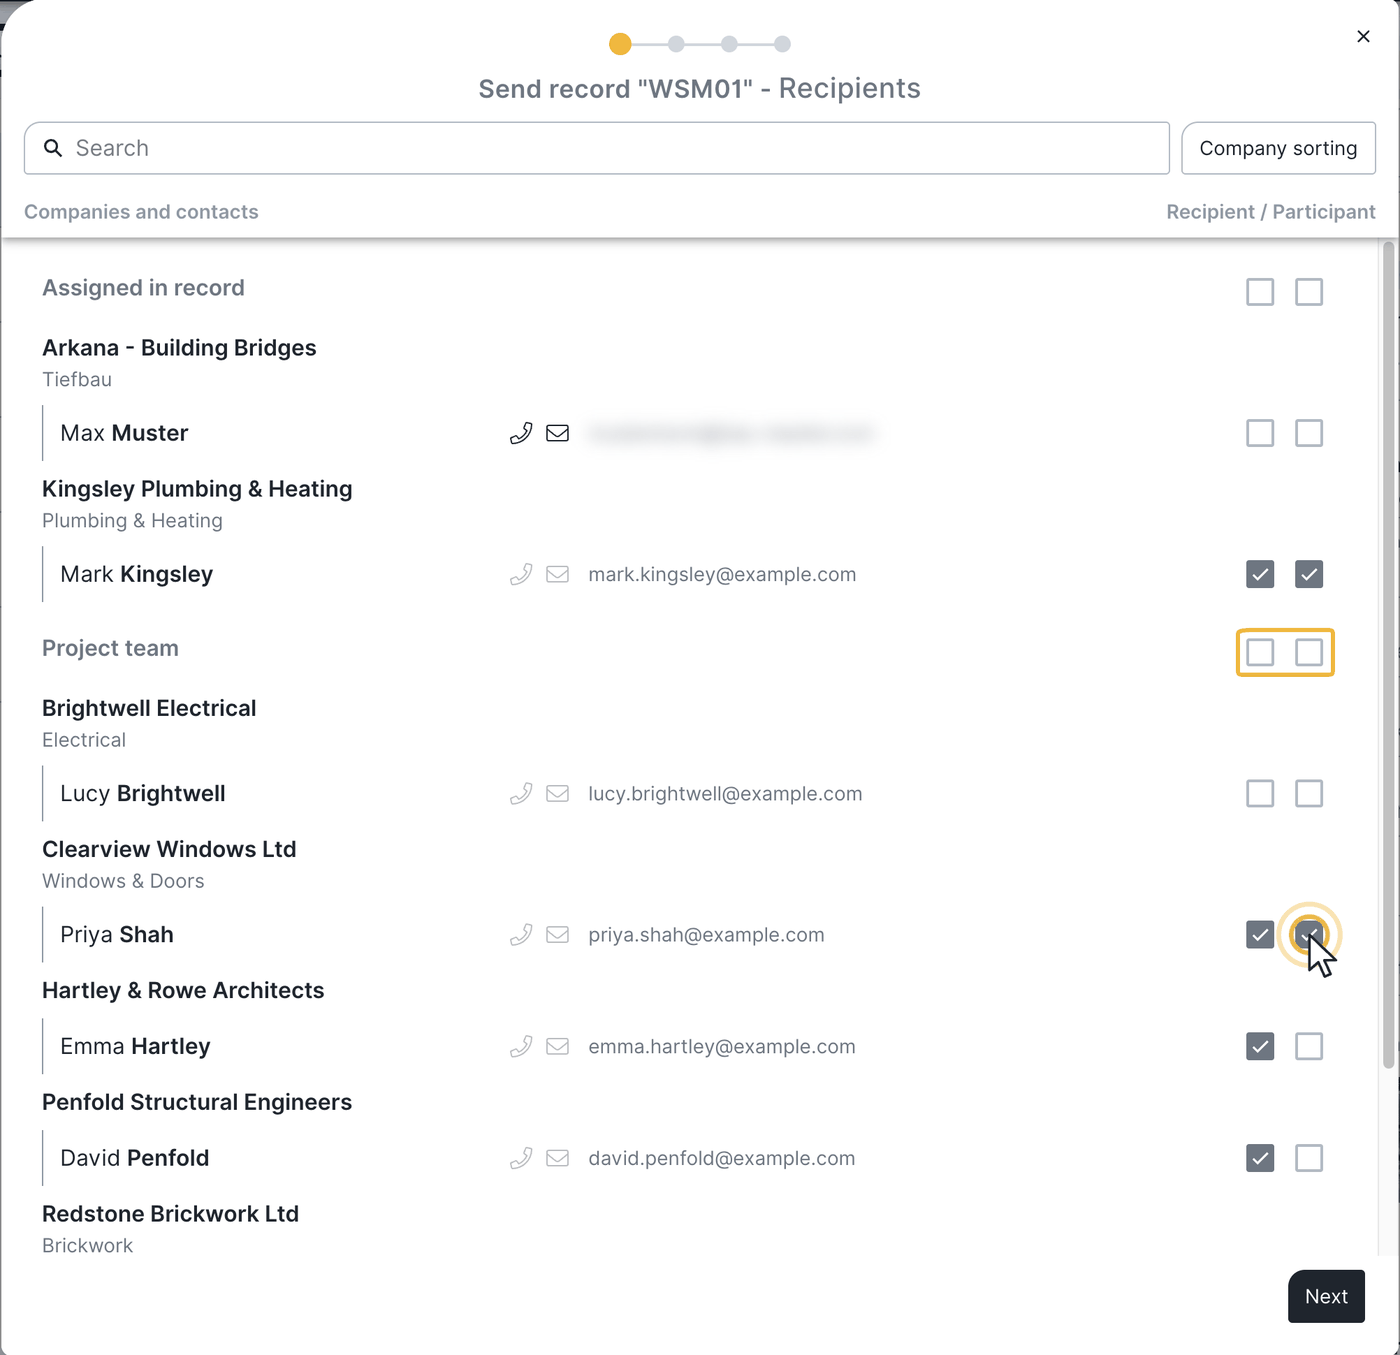
Change the company order in the distribution list
The distribution list is sorted alphabetically automatically. The order determines the sequence in which companies are printed in the recipient list on the cover sheet and, when grouped by company, on the entries. To move the client or the project management to the top, for example, adjust the order manually:
- After clicking Send, choose the action Change company order.
- Detach the company you want from the alphabetical order using the pin symbol.
- Drag the company to the position you want using the two-line symbol.
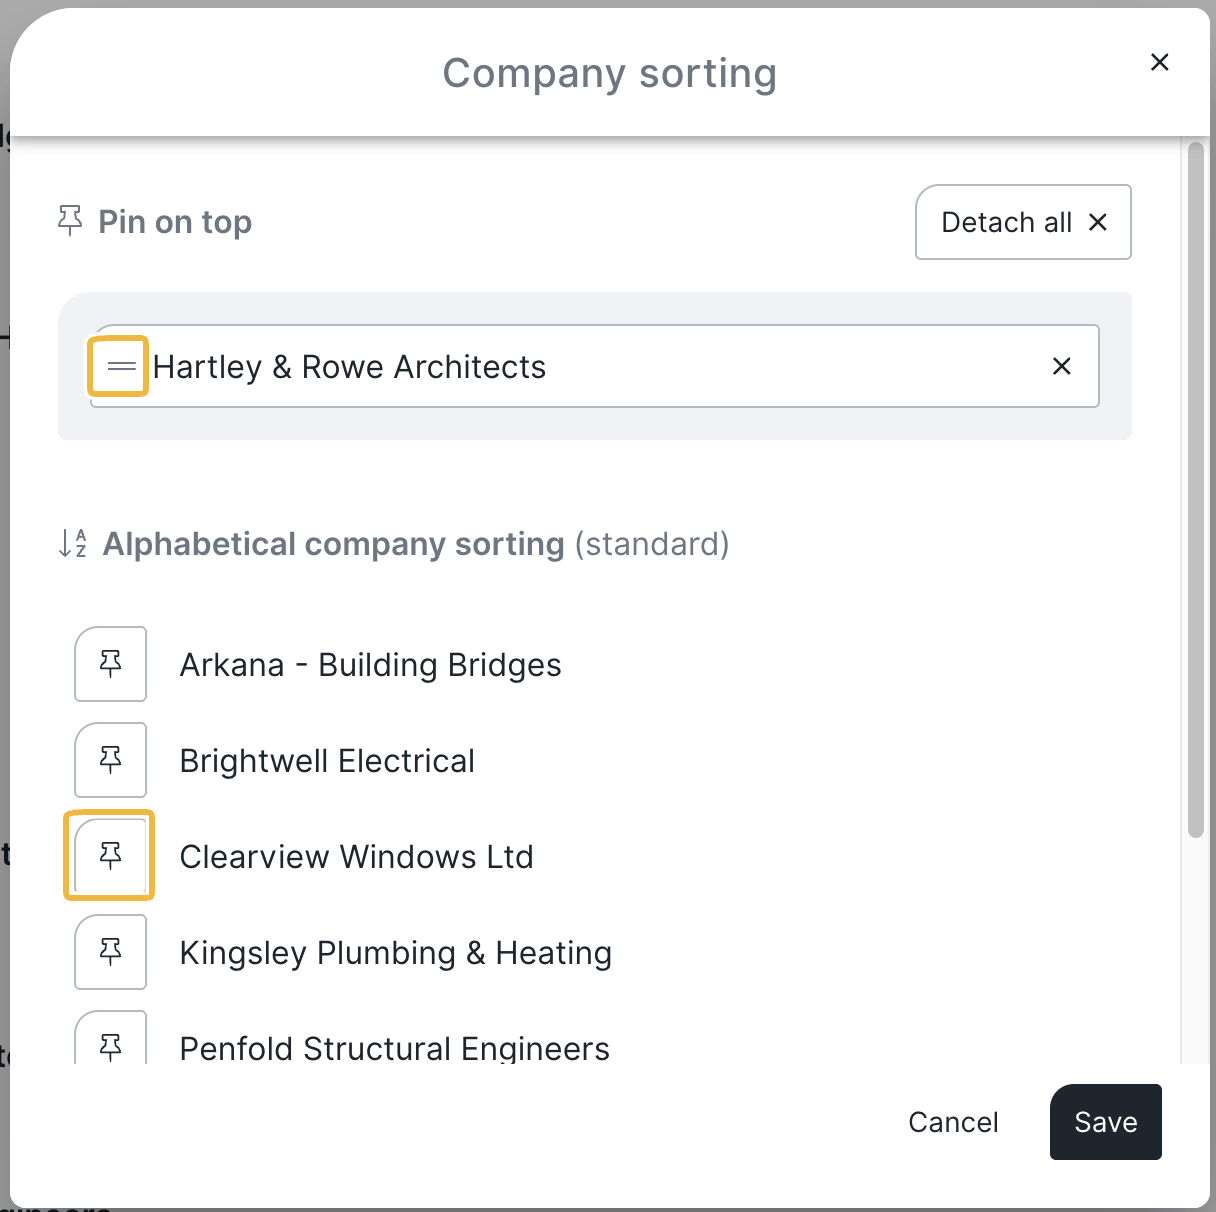
2. Set the layout
For this record you set the layout options you want, including:
- opening, closing and additional text,
- image size,
- advanced settings such as showing drawing markers.
If you have stored no PDF presets in the project settings, this dialog is empty. All layout options in detail: PDF layout settings and PDF presets.
3. Activate additional functions
Record per recipient — you choose which PDF documents are sent as download links:
- Complete record: contains all record entries of all companies.
- Individual record only: contains the general entries (company “project team”) and the entries where the recipient is entered as responsible.
- Complete + individual record: combines both documents.
Special case “individual record”: every recipient additionally receives a record containing only the general entries and those of their own company. Example: the electrician receives (1) the complete record with all entries and (2) their individual record with the general points and their own entries.
Set the next meeting — enable the checkbox to set date and time for a follow-up meeting. The meeting is also printed on the PDF record. Choose the participants from the distribution list. Optionally, participants receive an .ics calendar file by email via an additional checkbox.
Sign the record — after the “next meeting” step, enable signing in the sending dialog (available for Smart and Expert users). You add the signature either immediately via signature or later in the preview. If you leave the signature empty, a signature field with the name is printed on the record — for signing on paper.
- All contacts you marked as attending at the start are listed.
- Edit signatories lets you add further project contacts.
- Add signatory lets you store external people once (the client, for example) who are not created as a contact.
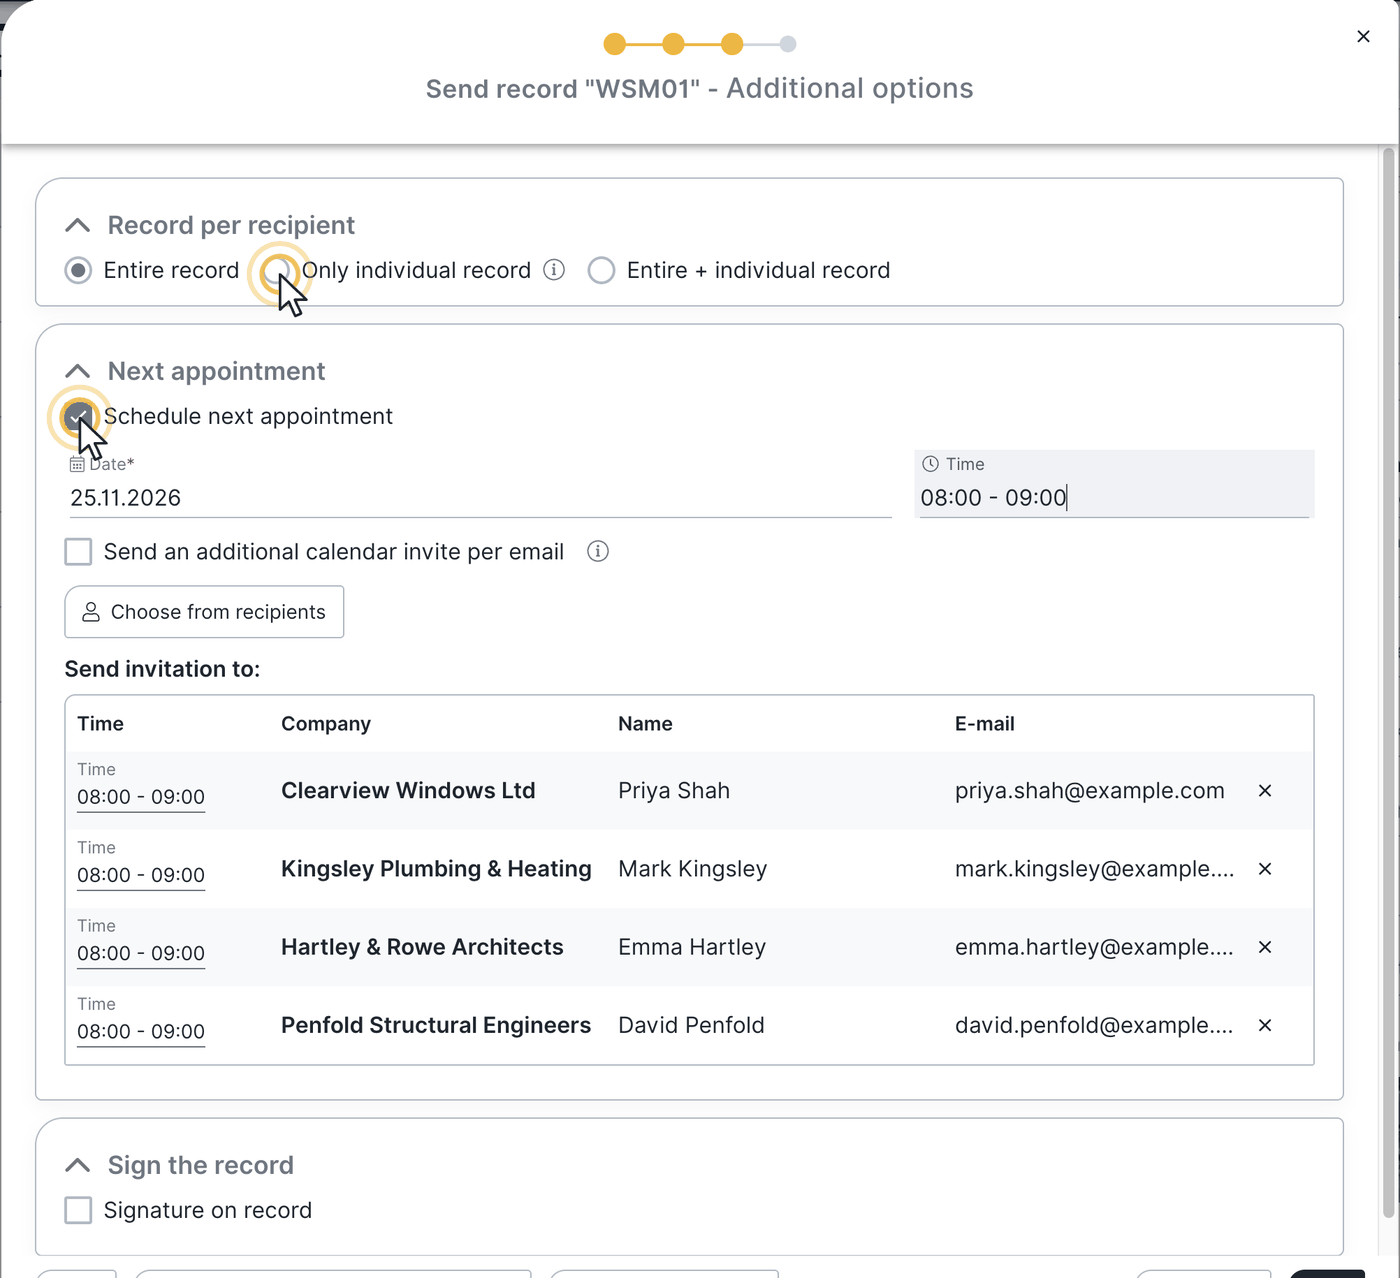
Save as template — you can save all settings as a template for future records of the same style.
4. Set up the email
Finally you reach the email dialog with these options:
- Subject: enter or change freely. The fields above show recipient, sender and reply address and cannot be edited.
- Email text: if you have stored no standard texts in the project settings, the field is empty and you add the text manually. Some buttons and passages are fixed and only serve as a preview for you — recipients later see an active button “View PDF record” for opening and downloading.
- Signature: via add signature you create your email signature — with closing, name, company logo and company details as you like — and save it. You can change it later in the account menu under Settings → User settings → Email signature.
- Close the record: on the last page of the sending workflow, next to the Send button, is the close record checkbox. You can also close a record via the three-dot menu in the record overview (Close record).
The record is sent as a link, not as an attachment. That is safer (less risk of harmful attachments), avoids the size limits of many email programs, and lets you trace who opened the record.
The finished PDF record
All selected recipients receive the record by email with a link for viewing and downloading the PDF.
View sent records: who the record went to and who has seen it (seen status) is shown in the recipient list on the record under Drawings & documents → PDF records. Who downloaded the PDF and when (download status) is shown in the overview of sent emails.
FAQ
Where can I see in advance what my record looks like?
Use “Preview & send” or the preview in the sending dialog. There you see the finished PDF before it goes to recipients.
What is the difference between distribution list and attending?
The distribution list defines who receives the record by email. Attending marks who was at the meeting — those contacts are then available for the digital signature. A person can be on the distribution list without having attended, and the other way round.
Why is the record sent as a link and not as a PDF attachment?
For security (less risk of harmful attachments), because of the size limits of many email programs, and so that it remains traceable who opened the record. A direct PDF attachment is therefore not provided.
Where can I see who opened the record?
Because the record is sent as a link, openings are logged. The seen status is shown in the recipient list on the record under Drawings & documents → PDF records. The overview of sent emails only shows the download status.
What is the difference between the complete and the individual record?
The complete record contains all entries of all companies. The individual record contains only the general entries (company “project team”) and the entries where the recipient is entered as responsible, or that belong to their own company.
Can I send filtered or individually selected entries separately?
Yes. Both filtered and selected entries can be sent as their own PDF, see Select and edit multiple record entries.
How do I send a new meeting appointment?
Enable the next meeting checkbox in the “additional functions” step, set date and time and choose the participants from the distribution list. Optionally participants receive an .ics calendar file by email.
How do I move a company to the front of the distribution list?
Via “change company order”: detach the company from the alphabetical order with the pin symbol and drag it to the position you want with the two-line symbol.
Why can't I edit some texts and buttons in the email?
Those passages are fixed and only serve as a preview for you. Recipients see an active button “View PDF record” for opening and downloading.
Why does a contact show "email address missing"?
Because no email address is stored. No PDF can be sent to that contact — add the address in the contact details.
Can I save a record as a PDF without sending it?
Yes. You can close the record without sending it. A PDF is then stored under Drawings & documents.
Can the record be exported as a Word file?
No. The record cannot be exported as a Word file.
Can I recall a record that has already been sent?
Yes. Under Drawings & documents → Sent emails, use the three dots at the top right of the email to deactivate the record and the links it contains.
Keywords: send PDF record